Android: Setting Up Active Sync on Android Devices
Print
Synchronization of Exchange mailbox data is supported on mobile devices with Android 2.0 OS or later. Before you start to configure a mobile device, you should do the following:
Contact your wireless provider and make sure your plan supports ActiveSync synchronization with Exchange server.
Activate ActiveSync service for the Exchange user. Read the Knowledge Base article on How Do I Enable ActiveSync Service For The User? for more information.
Make sure you can browse the Internet using the device browser.
General information:
You can find all settings here:
Administrators: CONTROL PANEL > Home > ActiveSync
Users: My Services > ActiveSync. Read the Knowledge Base article Where Can I Find ActiveSync Settings For My Wireless Device? for more information.
You may use the following combinations depending on the phone model. ActiveSync settings are exactly the same for all Android devices.
Domain Name: The Exchange domain,
Username: The username;
or
Domain Name: Leave blank,
Username: Enter full email address;
or
Domain\Username: Enter the Exchange domain and a username together in this field.
Below you will find the instructions to connect various Android devices to Exchange server:
Nexus
Samsung Galaxy S3
Motorola Droid RAZR
HTC Droid Eris
Motorola Droid
Droid 2
Droid X
HTC Thunderbolt
Kindle Fire
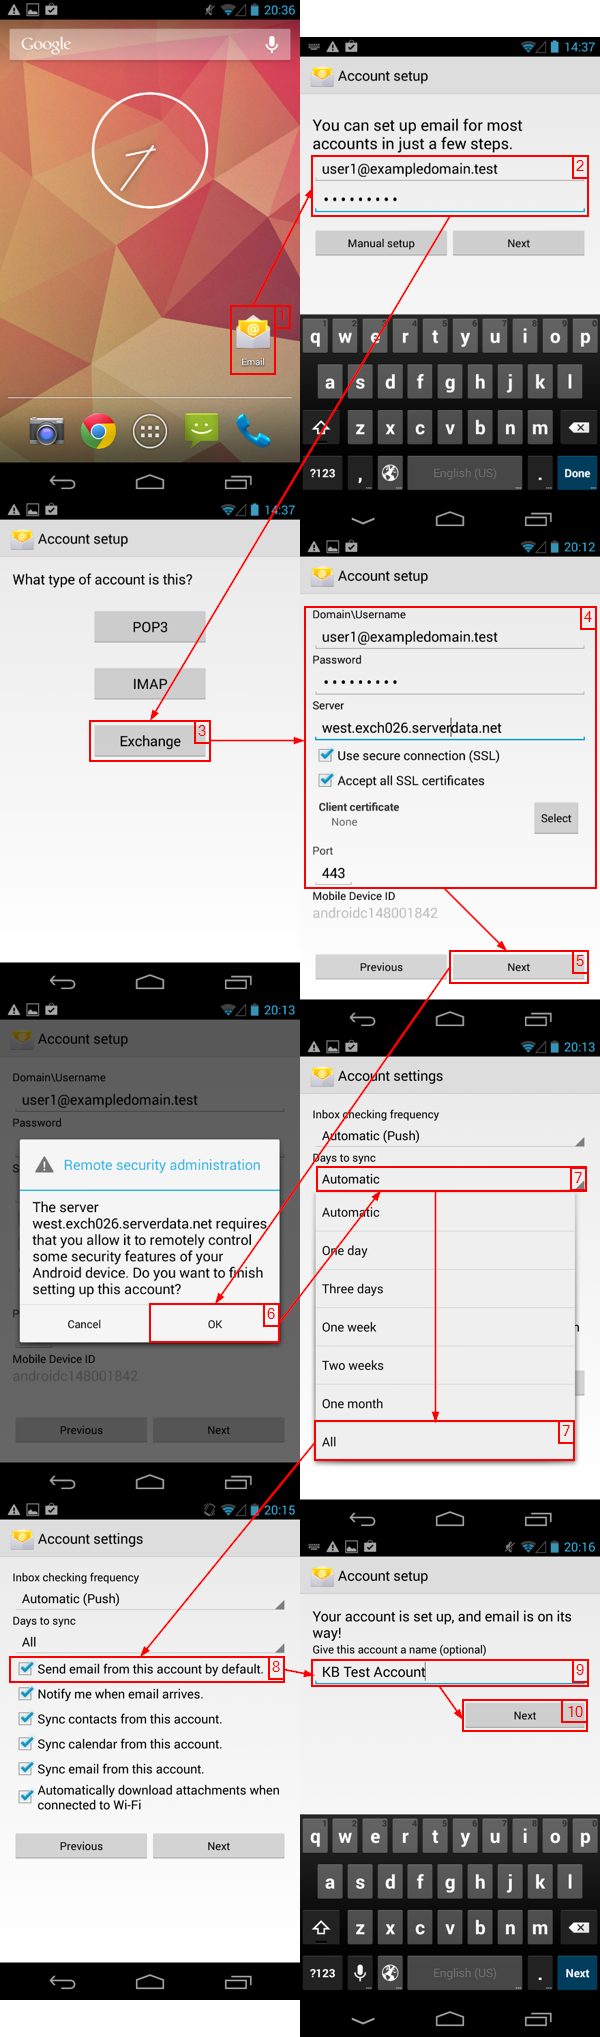
Setting Up ActiveSync On Google Nexus
 |
Nexus
In the list of Apps find Settings or native Email application.
Tap Add Account and type in your primary email address and your password.Â
Note: If you have an Autodiscover record compatible with Exchange server set up, tap Next, and your email account settings automatically. If the settings are populated incorrectly or you do not have that record, tap Manual setup.
Choose Exchange.
Type in the settings. You can find all the settings here:
Administrators: CONTROL PANEL > Home > ActiveSync
Users: My Services > ActiveSync. Read the Knowledge Base article Where Can I Find ActiveSync Settings For My Wireless Device? for more information.
Domain\Username: type in your primary email address.
Password: mailbox password.
Server Name: type in the correct Server Name.
Use Secure connection (SSL): checked.
Accept all SSL certificates: checked.
Port: 443
Click Next.
Accept the security prompt.
Change synchronization scope (YOUR COMPANY does not recommend to synchronize all the data for big mailboxes).
Set the account as default one if you want it to be your reply from account.
Provide description for the account (optional).
Finish the setup by tapping on Next button.
|
| Â |
SAMSUNG GALAXY S3
On the Home Screen of your device tap the Menu button and choose Settings.
Tap Add Account.
Choose Microsoft Exchange ActiveSync.
Type in your primary email address and your password.
Note: If you have an Autodiscover record compatible with Exchange server set up, tap Next, and your email account settings automatically. If the settings are populated incorrectly or you do not have that record, tap Manual setup.
Type in the settings. You can find all the settings here:
Administrators: CONTROL PANEL > Home > ActiveSync
Users: My Services > ActiveSync. Read the Knowledge Base article Where Can I Find ActiveSync Settings For My Wireless Device? for more information.
Domain\Username: type in your Domain\Username. This is case-sensitive.
Password: mailbox password.
Server Name: type in the correct Server Name.
Use Secure connection (SSL): checked.
Click Next.
Accept the security prompt.
|
| Â |
MOTOROLA DROID RAZR
Â
From the Home Screen select Apps.
Choose My Accounts. Note: If the application icon is missing, select App menu filter (located at the top) then select All apps.
Click Add account.
Choose Corporate Sync. If presented, review the Motorola Service agreement, select (check) I agree then select Next to continue.
Put in the correct settings. You can find the correct settings in CONTROL PANEL > Home > ActiveSync or My Services > ActiveSync.
Email address: Your primary email address.
Domain: Your Exchange domain.
Username: Your Exchange username.
Password: Your Exchange mailbox password.
If the device does not auto-detect the server you will need to specify it on the next step. Click OK.
Put in the server address a check use secure connection box. You can find the server address in CONTROL PANEL > Home > ActiveSync
Click Done.
|
| Â |
HTC DROID ERIS
Â
From the device home screen, touch the Applications tab (located in the lower-left), then touch Mail. If this is an additional email account, touch Menu > More > New Account.
Touch Microsoft Exchange ActiveSync.
Enter the Exchange primary email address and password, then touch Next. The primary email address is the one listed next to the user on the Mailboxes page in CONTROL PANEL. Setup will not work using an alternative email address.
Ensure the Exchange Server settings are correct. When you configure the device for Exchange, use the settings that can be found in CONTROL PANEL > Home > ActiveSync or My Services > ActiveSync.
Email address: Your primary email address (see step 3 for a definition).
Domain: Your Exchange domain.
Username: Your Exchange username.
Password: Your Exchange mailbox password.
Touch Next.
Check all settings again, and make sure that the following are set correctly:
Server address: You can find the server address in CONTROL PANEL > Home > ActiveSync.
This server requires an encrypted SSL connection must be selected with a green checkmark.
Touch Next.
Select the desired data to synchronize with the Exchange server (a green checkmark means that an option is enabled).
Touch Finish setup.
|
| Â |
MOTOROLA DROID
From the home screen, touch the Applications tab (located at the bottom of the screen), then touch Email. If this is an additional email account, touch Menu > Accounts > Menu > Add account.
Enter the Exchange primary email address and password, then touch Next. The primary email address is the one listed next to the user on the Mailboxes page in CONTROL PANEL. Setup will not work using an alternative email address.
Enter the Exchange Server settings in the appropriate fields. When you configure the device for Exchange, use the settings that can be found in CONTROL PANEL > Home > ActiveSync or My Services > ActiveSync.
Domain\Username: Your Exchange domain and username.
Password: Your Exchange mailbox password.
Exchange Server: Your Exchange Server name.
Ensure that the options Use secure connection (SSL) and Accept all SSL certificates are selected, then click Next.
Touch Email checking frequency to select how often you want to check for messages.
Touch Amount to synchronize to select the desired amount.
Touch the desired account options, then touch Next. The account option is enabled if it has a green checkmark next to it.
Send email from this account by default
Notify me when email arrives
Sync contacts from this account
Enter an account name and outgoing message name, then touch Done.
|
| Â |
DROID 2
Open the Applications list, select My Accounts, tap Add Account.
Tap Corporate sync.
Input the requiered settings:
Domain\Username: Your Exchange domain and username.
Password: Your Exchange mailbox password.
Email address: Your Exchange mailbox Email address.
Exchange Server: Your Exchange Server name. Tap Next to submit.
The handset will check with the server and verify if successful.
|
| Â |
DROID X
Open the Applications tray and select My Accounts.
Select Add Account. You will be at the Set Up Accounts menu, which displays several other social network icons.
Tap Corporate Sync. Enter the Exchange Server settings in the appropriate fields. When you configure the device for Exchange, use the settings that can be found in CONTROL PANEL > Home > ActiveSync or My Services > ActiveSync.
Domain\Username: Your Exchange domain and username.
Password: Your Exchange mailbox password.
Server: Your Exchange Server name.
Tap Next to submit settings. The handset will check with the server and verify if successful.
|
| Â |
Kindle Fire
From the device home screen, touch the Apps then select Mail.
If you donn't have an account yet, tap Add Account > Exchange e-mail, contacts, calendar. In case you do have an account and want to add another tap Menu > Settings > Add Account > Exchange e-mail, contacts, calendar.
When you configure the device for Exchange, use the settings that can be found in CONTROL PANEL > Home > ActiveSync or My Services > ActiveSync.
Name: Your full name.
Email address: your primary email address
Password: Your Exchange mailbox password.
Server address: You can find the server address in CONTROL PANEL > Home > ActiveSync.
Domain: Leave it blank.
Username: full email address.
Locate security settings:
SSL: On
Port: 443
Accept all SSL certificates: Checked
Accept the security prompt.
You may edit synchronization scope before you finish the setup (YOUR COMPANY does not recommend to synchronize all the data for big mailboxes).
|
Â
Â
Â
Â
Â
Â
HTC THUNDERBOLT
From the device home screen, touch the Applications tab (located in the lower-left), then select Settings.
Accounts & Sync > Add Account >Exchange ActiveSync > Account Settings > Configure Server.
When you configure the device for Exchange, use the settings that can be found in CONTROL PANEL > Home > ActiveSync or My Services > ActiveSync.
Email address: Your primary email address.
Domain: Your Exchange domain.
Username: Your Exchange username.
Password: Your Exchange mailbox password.
Server address: You can find the server address in $cPanelName > Home > ActiveSync.
This server requires an encrypted SSL connection must be selected with a green checkmark.
Verify all settings are correct and touch Save.
On some Android devices there are only two fields for setting up an Exchange account: Email address and Password. Use the following settings to set up the account:
Email address: User_Name@ServerAddress (correct settings can be found in CONTROL PANEL or My Services under Services > Home > ActiveSync)
Password: your mailbox password
Tap Add Account
Enter the Server address in the new field that will appear and change the Email address field to your primary email address. Tap Next to finish the setup.
Was this answer helpful?
