Configuring IMAP/POP Email On An Android
Note: this guide is compatible with is compatible with Android 4.0.
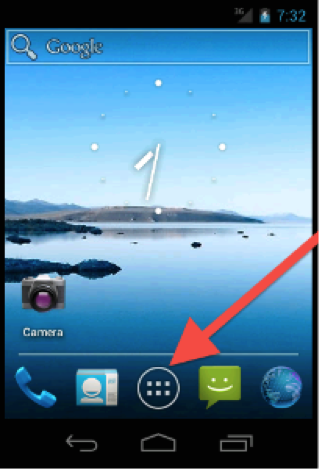
1. Tap the Applications icon
Generally, the Applications icon appears in your device's main screen.
The Applications screen will appear.
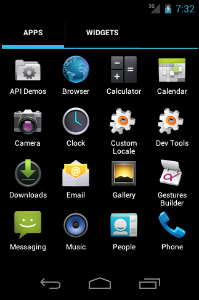
2. Tap Email
In the Applications screen, tap Email.
The Account setup interface will appear.
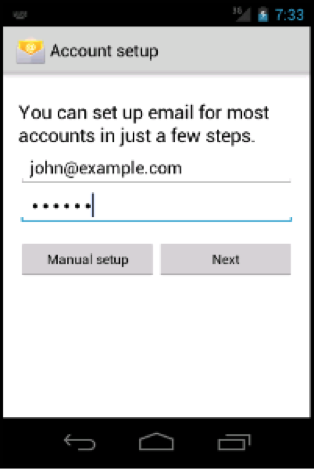
3. Enter your email address and password, and tap Manual setup.
Enter your full email address and password in the Account setup interface's text boxes.
Tap Manual setup to proceed to the next screen of the Account setup interface.
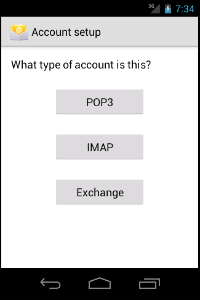
4. Tap the account type.
Tap the desired account type. The next screen of the Account setup interface will appear.
NOTE: We recommend that you select the IMAP mailbox type. If you select the POP3 mailbox type, the mobile device's email client will download all the account's email messages, and then remove the messages from the server. You will NOT be able to access those messages from any other email client.

5. Enter your account information and tap Next.
Enter the following information in the Account setup interface's text boxes:
- In the Username text box, enter your email address.
- In the Password text box, enter the password provided at the time the mailbox was created.
- In the IMAP server text box, enter the mail domain as “mail.domainname.comâ€.
- In the Security type text box, select SSL. This setting automatically sets the correct port.
(Note: Do NOT configure the IMAP path prefix setting)
Tap Next to proceed to the next screen in the >em>Account setup interface.
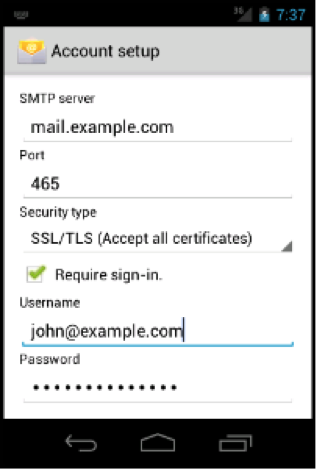
6. Enter your server information and tap Next.
Enter the following information in the Account setup interface's text boxes:
- In the SMTP server text box, enter the mail domain as “mail.domainname.comâ€.
- In the Security type text box, select TLS. Reset the port to 587. Select the Require sign-in checkbox.
- In the Username text box, enter your email address.
- In the Password text box, enter the password provided to you when the account was created.
Tap Next to proceed to the next screen in the Account setup interface.

7. Select your email preferences and tap Next.
Select the checkboxes that correspond to your desired email preferences.
(Note: If this account is to be the default mail account then check “Send email from this account by defaultâ€.)
Tap Next to proceed to the next screen in the Account setup interface.
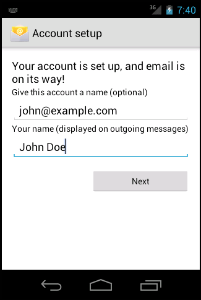
8. Enter your account and display names, and tap Next.
Enter an account name and display name in the interface's text boxes.
Tap Next to complete the setup process.
